Everything about modules and module positions.
Modules are Elxis extensions very similar to widgets or to mobile applications. They can be used to provide navigation, additional information, user details, and in general extend the functionality of the CMS. Modules are specilized. Accuweather for example displays weather, Simple poll displays polls. There is also a generic module that allows you to freely add content via the WYSIWYG rich text editor, this is module Content. Most modules are for the front-end section of the site but there are also modules for the back-end section such as Sticky notes.
Positioning
Unlike components which occupy the central space of a page, modules spread all over the page. You will see modules on the left and right columns, on page's top or even on page's footer. But how do we set where a module will be displayed? The short answer is by assigning them to module positions. Module positions get declared in the index.php file of the template by the person who designed the template. Each template has its own module positions. So if template A has a position named left it is not certain that template B will also have this position. We recommend template designers to keep some standard module positions in their templates in order when you switch template most important module positions to still exist and the site wont mess up.
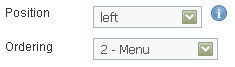 Consider a template having positions left, right and supertop declared. To make a module, any module, being displayed in position left navigate to Extensions -> Modules, click the module you are interested in to edit it and set Position to left. As you can assign multiple modules on the same modules position you can set the order in which they will be displayed by setting properly the Ordering option exactly below the Position. In case the position you like to assign the module does not exist in the list of positions Elxis shows you, (eg. in case you want to assign it in position supertop), this means that you have to create that position.
Manage module positions
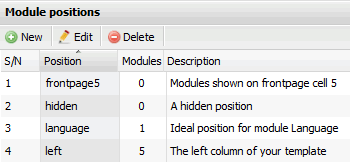 Navigate to Extensions -> Templates > Module positions. You will see a list of pre-defined module positions. To add a new module position click New. A lightbox window will apear. Type a name for that position (eg. supertop) and an optional short description. Click Save and you are done. The position names should contain alphanumeric latin characters and digits. No special characters or spaces are allowed. You can also select a module position to edit it, or even delete it. In the list of the already existing module positions you can also see the number of modules assigned to each one.
Positions for back-end modules
In the list of the module positions you will notice that the description for some of them starts with the word Admin. These positions are for back-end modules. Position cpanel is the right column of control panel's dashboard. cpanelbottom is below the main dashboard icons. Position tools is the right part of the administration toolbar.
Frontpage module positions
The default Elxis frontpage is a grid that can be freely designed. This grid can have up to 17 cells. Each of these cells is a modules position named as frontpage followed by the cell number. For example the cell with the number 5 is the module position named frontpage5. So, by assigning modules in position frontpage5 they will be displayed only in site's frontpage and in that specific position. That way you can easily design front-pages with very custom layout and contents.
Modules in content categories
 Elxis has a cool feature in showing modules in content category pages between the category's articles. The exact spot where these modules will be displayed depends on the chosen layout for each category.
Elxis has a pre-defined position named category. This position is a general placeholder for category pages. But you can freely pick any other module position for each category independently.
Consider the following senario. You have a category listing football match reviews and an other category listing vacation places. We want to display ads related to footbal in the football pages and ads related to hotels and tourism to the places pages. We first create 2 new module positions and named them football and hotels. After we go to Extensions -> modules and create a copy (or 2 copies - see below on copying modules) of the built-in ads module. We configure the first instance of the module to display footbal ads and assign it in position football. After that we configure the second instance of the module to display hotel and tourism related ads and assign it in position hotels. Our modules are ready. We need now to tell Elxis to display these positions into the corresponding category pages. Go and edit the "footbal" category (Content - > Categories). On the parameters tab set the value of the Inner modules position option to football. Do the same for the places category and pick now the hotels position. That's it. In the football pages the visitors will see ads related to football while on places pages will see ads related to hotels. Off course you can re-use the same positions in other categories too. You can also add module modules in these positions without having to re-configure the category pages.

Module assignment
When you set a module to be displayed in a module's position (eg. left), by default this module will be visible in all pages. If you want you can change that by assigning the module only to specific pages. To do so, go to the module's edit page (Extensions -> Modules -> Click to edit) and on the Module Assignment tab select the pages (menu items) you want this module to be visible. You can select multiple items by pressing the Ctrl key while clicking on the items of your interest.
Modules CSS suffix
Almost all modules have a CSS suffix option. With this option you can change the the style of a module. How? Well, modules are being displayed inside a DIV tag with the CSS class module. By filling in a CSS suffix in the module's parameters you append that suffix in the conteiner DIV's CSS class. So if this suffix is "_test" the CSS class of the container DIV will become module_test. By changing the CSS class we can have different style for this module. If you place the example CSS declarations in your template's css file and then apply the _test suffix in a module, then this module will have its title coloured green while all other module titles red.
.module h3 { color:red; }
.module_test h3 { color:green; }
Elxis will generate this HTML code for the module:
<div class="module_test">
	<h3>Module title</h3>
	<div>module contents</div>
</div>
Modules and cache
Modules output can be cached. By caching a module you speed up your site as Elxis retrieves the module output from cache instead of quering the database and running the module's PHP code again and again on each click. Read more about modules and cache.
Copying modules
 Modules have a very cool feature, they can be copied and each copy of the module can have its own settings. So when you install a module, don't think that it can be used only once, you can use it unlimited number of times. Consider you have module Accuweather configured to display weather for London. You can create a copy of that module and configure the module to display weather for Paris. You can now display these 2 instances of the same module in the same or different module positions and each of these instances will display different things based on the different parameters you havce supplied to each instance.
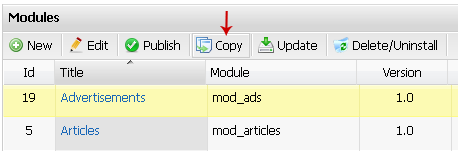
To copy a module go to Extensions -> Modules, highlight the module you are interested in and click Copy. That's it! Elxis will generate a copy of that module and you will be able to edit it's parameters immediately after that.
Debug module positions
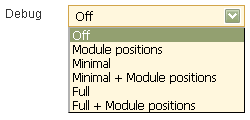 In Elxis global configuration there is an option to debug Elxis. Among the debug options, 3 are very related to modules and module positions. By picking Module positions, Minimal + Module positions, or Full + Module positions Elxis will display highlighted boxes in the exact spots where the template renders the module positions. In each of these boxes you can also see the modules assigned to each position. With debug you can get a very clear idea on how the current template renders the modules and which module positions it has.
Module Content
Elxis has a built-in generic module named Content. In module Content you can use the WYSIWYG rich text editor to add in module any text you like, including images, media files and even content plugins! What you do in a standard article you can almost do in module Content. And don't forget that you can copy modules, Content including. This means that you can create unlimited Content modules with any different text you like.
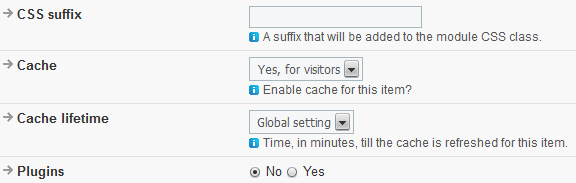
To create a new instance of module Content go to Extensions > modules and then click New. In the picture below you can see the parameters of module Content. If you want to run plugins in this module set the Plugins option to Yes (by default it is No). To include a plugin (eg. the maps plugin) into that module type in the editor area the plugin's integration code:
{ map }latitude,longitude{ /map }
Access
The default ACL values for accessing modules are:
- Install/Update/Uninstall/Synchronize a module: Only administrators are allowed (group id = 1)
- Manage a module from the administration section: Access level 70 and up (managers, administrators)
- View module's frontend section: Access level 0 and up (everyone).
Develop your own modules! Start by reading our modules development guide.

Users guide
Latest Articles
You are free to copy, distribute and transmit the articles in this site for non-commercial purposes.
![]()