A complete guide on how to create a module for Elxis.
In this guide we will show you how you can create a simple module for Elxis which will be able to be installed via the Elxis installer. You can extend this module further to develop more advanced modules for any purpose you like. We will name the module that we are going to develop for documentation purposes Helix (mod_helix). We are going to use object oriented (OO) programming style, it is easy, don't worry.
Module files
A module has a number of required files and others which are optional. Off course you can add any custom file, like images and css, in your module. All Elxis modules are physically located inside folder modules/. Each module is in its own folder named as the module name in the XML installation file, in our case mod_helix. So our module's files will be placed inside folder modules/mod_helix/. As the module doesn't yet exist we will create the required files and folders manually. Start by creating the mod_helix folder! Inside this folder create 2 empty files: mod_helix.php and mod_helix.xml. These are the minimum files a module should have. Elxis supports more (optional) files as well as you can always put your own files too. Bellow you can see the full list of Elxis related files a module can have and a description for each one.
mod_helix/
	mod_helix.php (required - the php file Elxis executes)
	mod_helix.xml (required - contains XML parameters and information about the module such as version, author, etc)
	install.php (optional - contains actions to be performed during module install, uninstall and update).
	language/
		en.mod_helix.php (optional - English language file)
		el.mod_helix.php (optional - Hellenic language file)
		it.mod_helix.php (optional - Italian language file)
		de.mod_helix.php (optional - German language file)
		...etc..
If you want your module to have custom styling, some images, some javascript files, or anything else create additional folders and put there your custom files. For consistency we advise you to name these folders css, images, js, etc...
mod_helix/
	css/
		mod_helix.css
		mod_helix-rtl.css
	images/
		arrow.png
		help16.png
		screenshot.jpg
	js/
		mod_helix.js
		jquery.something.js
	db/
		mod_helix_mysql.sql
		mod_helix_pgsql.sql
	includes/
		helix_dna.php
The XML file
As we previously said the XML file contains parameters to configure the module output and information about the module it self. Note that Elxis modules and all other extension types do NOT needs to list module files in the XML file as we did on Elxis 2009.x series.
Package declaration
The XML file starts and ends with the package tag. The type attribute declares the type of Elxis extension, module in our case. The optional section attribute declares the site section (frontend or backend) this extension is for. If we ommit the section tag it will be considered as a frontend extension [1].
<package type="module" section="frontend">
</package>
Extension information
Inside the package tags we will place some information about our module. Some of them are required, others optional. We strongly recommend you to fill all of these.
<name>mod_helix</name>
<title>Helix DNA</title>
<created>2012-11-16 20:21:00</created>
<author>Domenikos Theotokopoulos</author>
<authoremail>domenikos@example.com</authoremail>
<authorurl>http://www.example.com</authorurl>
<copyright>(C) 2012 example.com. All rights reserved</copyright>
<license>GNU/GPL v3</license>
<licenseurl>http://www.gnu.org/licenses/gpl-3.0.html</licenseurl>
<link>http://www.example.com/extension_details.html</link>
<version>1.0</version>
<description><![CDATA[This is a test module for Elxis]]></description>
<dependencies>
	<package type="core" version="5.x">elxis</package>
</dependencies>
Creation date (created) should be in GMT and follow this format YYYY-mm-dd HH:ii:ss. Description can also be a language string from the language files. Dependencies are other extension this module depends to. This module is compatible with Elxis of version 5.x (5.0, 5.1, 5.2, etc) [2]. Items authoremail, authorurl, link, copyright, license, licenseurl, and description may be ommited (not recommended).
Parameters
After the informational tags we will put 2 parameter groups (tag params) with some parameters inside it. Detailed information about the XML parameters syntax and supported types can be found in the corresponding guide [3]. Your module does not have to have parameters, they are optional. But by providing parameters you give the user the option to configure the module output without having to modify the source code. Our sample module will optionally display the current date, and a custom link with custom title. Link and Title parameters are multilingual inorder to be able to show different things to users depending on current selected language in frontend. We add a parameters group and place these parameters in.
<params group="HELIX_SETTINGS" collapsed="0">
	<param type="radio" name="date" default="1" label="SHOW_DATE" description="SHOW_DATE_DESC">
		<option value="0">NO</option>
		<option value="1">YES</option>
	</param>
	<param type="text" name="link_title" default="" multilingual="1" dir="rtl" label="LINK_TITLE" description="" />
	<param type="text" name="link_url" default="" multilingual="1" dir="ltr" label="LINK_URL" description="" />
</params>
We will add one more parameters group with some default parameters for Elxis required for custom styling and cache. These parameters are optional but if we dont add them the module's output wont be able to be cached or the user to provide custom styling.
<params group="GENERAL" collapsed="1">
	<param type="list" name="cache" default="2" dir="rtl" label="CACHE" description="ENABLE_CACHE_D">
		<option value="0">NO</option>
		<option value="1">YES_FOR_VISITORS</option>
		<option value="2">YES_FOR_ALL</option>
	</param>
	<param type="list" name="cachetime" default="0" label="CACHE_LIFETIME" description="CACHE_LIFETIME_D">
		<option value="0">GLOBAL_SETTING</option>
		<option value="300">5</option>
		<option value="600">10</option>
		<option value="900">15</option>
		<option value="1200">20</option>
		<option value="1800">30</option>
		<option value="2700">45</option>
		<option value="3600">60</option>
		<option value="7200">120</option>
		<option value="10800">180</option>
		<option value="14400">240</option>
		<option value="18000">300</option>
		<option value="21600">360</option>
		<option value="36000">600</option>
		<option value="43200">720</option>
		<option value="86400">1440</option>
		<option value="172800">2880</option>
	</param>
	<param type="text" name="css_sfx" default="" dir="ltr" label="CSS_SUFFIX" description="CSS_SUFFIX_D" />
</params>
Our XML file is ready! We must now enter inside the module language files the custom language strings we have used in the XML parameters for Group names, labels and description elements. Some of these language strings are already defined in global language file (en.php, de.php, el.php, etc..) so we don't have to declare these.
The language files
As we said language files are optional, but as we used some custom laguage strings in our XML file we need to declare these on the module XML files. Language strings are entered as elements of a PHP array with named $_lang. The language files should be encoded as UTF-8 (without BOM). For our sample Helix module we will create language files for the English and Greek languages. You can add more if you like. First, create the files.
language/en.mod_helix.php
language/el.mod_helix.php
Now open en.mod_helix.php[4] and add the following.
Copy the contents of the english file to the Greek one (el.mod_helix.php) and translate it into Greek. Do the same for the rest languages. Language string MOD_HELIX_TITLE (format: {mod_name}_TITLE) is used by Elxis to provide the automatically multilingual module title. Language strings CURDATE_IS and HELIX_ERROR_MSG are not in XML file but we will use them later on module's PHP file.
The PHP file
File mod_helix.php will be included by Elxis automatically on runtime. This is where we will place the PHP code to generate the module output. There are unlimited ways to write PHP code for the module. We will use object oriented programming style in PHP and a method of single point of entry which we consider easy and secure. Most Elxis modules are coded this way. With this method there will be only one public method (run) and all others will have private visibility meaning that they can be called only by the module's inner code.
Let's see what we have done. At the very bottom of the file we have initialized the modHelix class. When modHelix initializes the magic method __construct is executed. Inside the class constructor we get the values of the module parameters and we check if the link title and url are valid. If not, (empty or invalid link) we set the value of the error property to 1. After the constructor we execute the method run. This method will generate and output the actual module contents. On the very top of this method we check if the value of error is 1. In this case we display an error message by calling method showError and run execution stops there. If everything is OK we continue showing the current date (if date parameter is 1 -Yes-) and the custom provided link. Note that for the link title and URL parameters we used the getML method of elxisParameters class instead of the standard get method as these 2 parameters are multilingual. $eDate and $eLang are instances of the elxisDate and elxisLanguage classes and we get them via eFactory. You can also see that our module's language strings are directly available from $eLang. We dont have to include the language files or do something special. Elxis will do the job automatically!
Custom install actions
During module install, uninstall and update you can execute custom actions (for example create database tables, create files, send an email, unzip something, etc). If you wish such functionality create a file named install.php in the module's root folder and place inside it the following.
Inside the install, update and uninstall methods write your custom code to be executed during the corresponding module statuses.
The installer class name should follow this pattern: {extension name as on XML}_installer
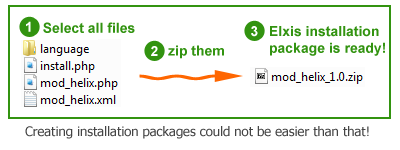
Create a ready to be installed package
Your module is ready. We need now to create a zip package able to be installed via the Elxis installer or EDC live. Browse into the mod_helix folder, select all files and zip them. Name that zip mod_helix_1.0.zip. That's it! Everyone is now able to install your module package via the Elxis installer or EDC.
Download sample module
Download the sample module Helix of this example. You can install it as usually via the Elxis installer.
Notes
- You can also develop modules for Elxis administration area. In this case set section="backend"
- Read more about extension dependencies.
- XML parameters syntax and supported types.
- Always start with the English language. English is used by Elxis as a failover language when no other language is available. All other language files should be translations of English.
Οδηγός προγραμματιστών
Πρόσφατα άρθρα

Κατασκευάστε μηχανές που επεκτείνουν την αναζήτηση του elxis οπουδήποτε μπορείτε να φανταστείτε
Μπορείτε να αντιγράψετε, διανείμετε και παρουσιάσετε τα άρθρα αυτού του ιστότοπου για μη εμπορικούς σκοπούς.
![]()