Manage multiple sites under a single Elxis installation.
Elxis gives you the ability to have multiple sites under one Elxis installation. This means that you don't have to re-install Elxis in a sub-folder to have a second site. You can simple enable multisites! These sites will share the same file system but have different configuration files and different data stored in the database.
Enable multisites and create sub-sites
Navigate to Site -> Multi sites. If multisites are enabled you will see a list of all the sites under this Elxis installation. If not, you will see a link to enable multi-sites. After you click it multisites get enabled, the initial site becomes the mother site. You can now add more sites under this installation. These sites are called sub-sites and (usually) are database copies of the mother site. Sub-sites have some limitations (mostly for security reasons) which will discuss about later in this article. Click the add icon next to the mother site to add your first sub-site.
configuration.php and Elxis root folder must be writable to enable multisites and create sub-sites.
A lightbox window will appear asking some information.
- Name The name for the sub-site.
- URL identifier A short Latin alphanumeric string that will be used as identifier for this sub-site. If your mother site is http://www.example.com and the url identifier is news then the subsite will be accessible as http://www.example.com/news/ [1]
- Active Whether this sub-site is active or not [2].
Exactly below, Elxis ask for information for the database of the new sub-site. You can provide the same database as the mother site with a different tables prefix (elx_, elx2_, elx3_, etc...), or if you want these databases not to be mixed, provide settings for a new database you have previously created. A very important option is if you want to import data to your new database from the mother site or not. If you select not to import data then only the database tables will be created and the database will be empty! The sub-site will not be useful unless you import SQL data manually (via phpmyadmin for example). This option is useful if you want to import data you have previously created in a local or other site. But you must be VERY careful on what you will import [3]. The easy procedure is to select Yes in importing data. In this case an exact copy of the database of the mother site will be imported to the database of the sub-site [4]. This means that in the sub-site the same users, articles, extensions, parameters, etc, will exist as on the mother site.
When ready click Save to create the sub-site. The sub-site has been created. You need now to write some rules on the .htaccess file for this sub-site. Open .htaccess (you will find it in Elxis root folder) for edit, locate the spot which is for sub-sites and paste the code below. When ready save .htaccess file.
RewriteRule ^mysub/estia/inner.php estia/inner.php [L]
RewriteRule ^mysub/inner.php(.*) inner.php [L]
RewriteRule ^mysub/(.*) $1
Replace mysub with the URL indentifier of your sub-site and estia with the name of your administrator folder in case you have renamed it.
Separating sites
Each site has its own configuration file. The original configuration.php becomes config1.php which stores the configuration options for the first site (the mother site). The configuration options for the second site are stored in config2.php, for the third site in config3.php, and so on. The original configuration.php now stores an index of the existing multisites. Elxis also applies a PHP constant on each multisite named ELXIS_MULTISITE which value is an integer equal to the increment index number of each multisite. This PHP constant exist only when multisites are enabled and so it is a way for the developers to know if multisites are enabled and which one is running.
If ELXIS_MULTISITE = 1 then the first site has been requested.
If ELXIS_MULTISITE = 2 the second one, etc...
If ELXIS_MULTISITE constant has not been declared multisites are disabled.
User uploaded files are kept in separated folders for each sub-site. The administrator of the mother site is allowed to access all files. The administrators of the sub-sites are able to access only files for their one site. Elxis creates special folders in the media/images/ and other system folders to separate user uploaded files. These folder are named as siteX where X the index of the sub-site.
media/images/site2/ (images uploaded by the second site)
As the administrator of the mother site is able to access all files he must be careful not to delete files (eg. images) used by a sub-site. By deleting a sub-site its user files and database does not get deleted.
Extensions synchronization
It is not allowed to install, update or un-install extensions from sub-sites. This can be done only on the mother site. So what if I need
a third party module in a sub-site that it is not available? We have a solution for you and it is called Synchronization.
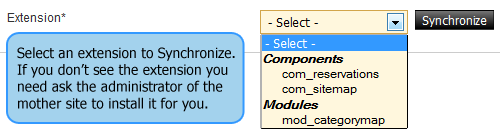
Ask the administrator of the mother site to install this extension. Then log in to the sub-site and navigate to Extensions -> Synchronize.
Pick the extension in which you are interested in and click Synchronize. The extension will become available in your sub-site.
As installing extensions from sub-sites is forbidden when you browse EDC live you will see only a download button for the extension. No, install and update buttons.
Security
Although Elxis does separates data and user uploaded files, sub-sites still share the same file system with the mother site. Elxis Team recommends that the administrators of the sub-sites should be trustful to the one of the mother site. Don't create sub-sites and give them to be administered by people you don't trust! Also if you have imported data from the mother site, change the administrator and rest users passwords in the sub-sites.
Notes
- You must wisely choose the URL identifier. Make sure no physical folder exist with the same name in Elxis root folder. Make sure no component, or content category, or other, has the same name as SEO title. Make sure the sub-site URL identifier is at least 3 characters long.
- You can activate and de-activate multisites at any time.
- When you import manually data you must make sure the physical files existing in these data exists as files in the Elxis installation. For instance if the SQL data have a custom module installed and this module does not exist in the mother site you will face problems. The same can happen with article images and any other file. Use manual import method only when you fully understand what are you doing.
- At the moment of writing this article importing data is only supported for MySQL and PostgreSQL database types.

Users guide
Latest Articles
You are free to copy, distribute and transmit the articles in this site for non-commercial purposes.
![]()