The absolute guide of Elxis installation
The present article is the official Elxis installation guide. You can download the current version of Elxis CMS from the official website Elxis.org.
So let’s begin!

Steps before the installation
Uploading Files After downloading the installation package, either upload the zip file on the server or unzip the zip file locally on your PC and upload the files, individually, via FTP. We recommend the first case, if it’s supported by the control panel of your hosting package [1].
Database
Create an empty database which will be used by Elxis to store your data in. We strongly recommend to use a MySQL database. Although Elxis has back-end support for other database types such as PostgreSQL and SQLite 3 it is well tested only with MySQL. To create an empty MySQL database do so from your hosting control panel (CPanel, Plesk, ISP Config, etc) or from phpMyAdmin or other database management tool. Just provide a name for your database and create it. After that, create a database user and assign him to your newly created database. Write somewhere the database name, the username and the password, we will need them later during install.
Repository
Elxis uses a special folder to store cached pages, log files, sessions, backups and more. By default this folder is named repository and it is placed inside the Elxis root folder. This folder must be writable! We strongly recommended to rename this folder and move it in a place not reachable from the web. After this move if you have enabled open basedir protection in PHP you might also need to include the repository path into the allowed paths.
| /sample/path/to/site/public_html/ | Sample Elxis path |
| /sample/path/to/site/public_html/repository/ | Default repository path |
| /sample/path/to/site/secret_repo/ | Recommended repository path |
Installation Steps
In Elxis 4.x, 5 installation steps are presented totally, through the installation process. 3 steps fewer than the previous series of Elxis CMS 2009.x! These steps were designed and executed by the Elxis Team, so the user can make the fewest possible steps!
Step 1
In the 1st Step, the installation information is presented. How to create a database and how we define the repository for Elxis (information above and picture below).
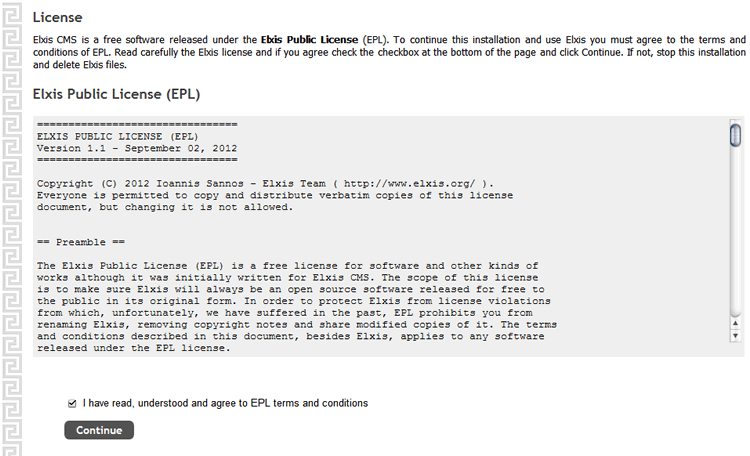
Step 2
In the 2nd Step appears the Elxis CMS license. The new Elxis is released under the new Elxis Public License (EPL). To continue the installation you need to read and agree with the Terms of Use. If you do not agree to this license, we urge you to stop the installation and delete the Elxis CMS files.
Step 3
In the 3rd Step we define the necessary parameters of Elxis. You can set some mandatory parameters in this step. The rest of the parameters can be defined after the completion of the installation, from the administration area.
General Settings
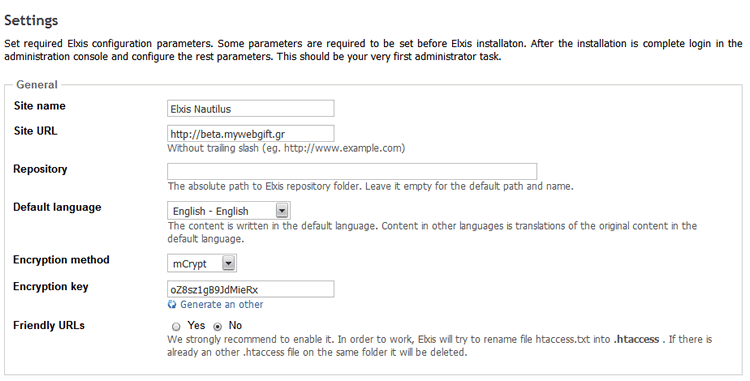
Site name: Specify the name of your website.
Site URL: Specify your website’s URL. Elxis has taken care by auto completing this field. The address should be in the form of http://www.example.com. In the above image you see the installation proceeded on a sub domain (more information for installation on a sub domain).
Repository: Set the absolute path for the Repository. We recommended you to change the location and rename the folder. Leave this field blank if you do not want any change.
Default language: Select your website’s predefined language.
Encryption method: Select the method of encryption.
Methods available: Automatic, mCrypt and XOR. Default Value: mCrypt.
Encryption key: The encryption key is generated automatically. You can create a new key, by clicking 'Generate an other'.
Friendly URLs: Option to enable friendly URLs. We recommend the activation of this option. Upon activation you will need to rename the htaccess.txt file to .htaccess. This file can be found in the main (root) folder of your Elxis installation. If another .htaccess file exists, it will be deleted.
Database Settings
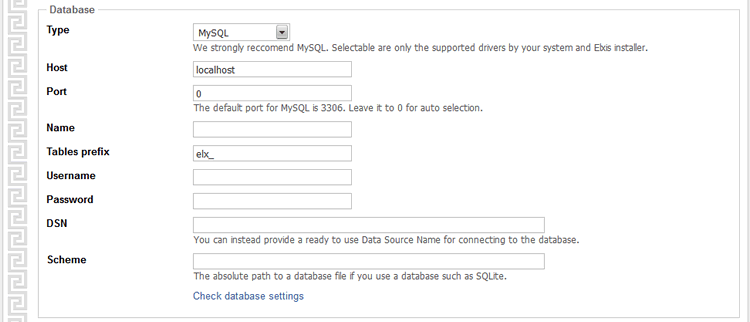
Type: We recommend the use of MySQL database. Selectable are only the supported drivers by your system and Elxis installer.
Host: Automatically set by Elxis, but you can change this field. More information on this can be given by your hosting provider.
Port: The default port for MySQL databases is 3306. Leave it to 0 for automatic selection.
Name: Write the name of the database you have created and specified for use of Elxis.
Table prefix: Select the prefix of the tables created by the installation. Default Value: elx_. You can set different prefix for the database tables.
Username: Specify the user (username) that has administrator rights on the database.
Password: Specify the password of the user who has administrator rights on the database.
DSN (Data Source Name): Set the DNS connection to the database. This field is not mandatory but you can use it, as an alternative option, if you know the DNS connection.
Scheme: With this option we can define the absolute path of the file where the database is located. This field is not mandatory, as it’s been used on SQLite databases.
After you have completed the above parameters, you may check the correctness of the imported data. Elxis will inform you if the data is set correct or not.
FTP Settings
We recommend the defining of the FTP settings, at this point. However you may define the following settings, after the completion of the installation, from the administration area of your Elxis site.
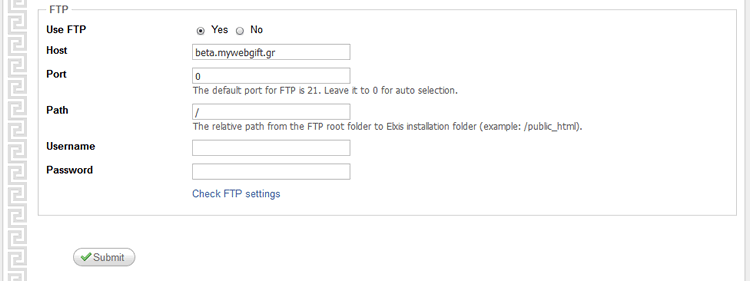
Use FTP: Enable or Disable FTP.
Host: This field is been set automatically set by Elxis. Defined in general as: example.com.
Port: Port 21 is the default port for FTP. Leave it to 0 for automatic selection.
Path: Define the relative path of your Elxis installation folder. Example: /public_html
Lastly, input the Username and Password of the user who has FTP access. After you have completed the above parameters, you may check the correctness of the imported data.
Step 4
Shortly before the installation is complete, you will be asked to fill in the access data for the administrator’s account. Elxis initially informs us that the necessary data has been created on the database, by performing a certain number of requests as we have set in Step 3 above. So let's create an Administrator account!
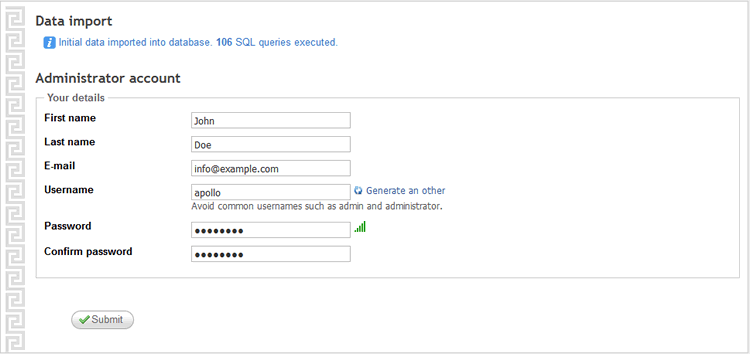
Username: You may define the username you wish or instead let Elxis create a username! We advice you to avoid common usernames such as admin, administrator exc.
Password: In the password field you can check, in real time, how secure your password is considered, according to Elxis safety standard. Use letters, numbers and symbols such as underscore (underscore).
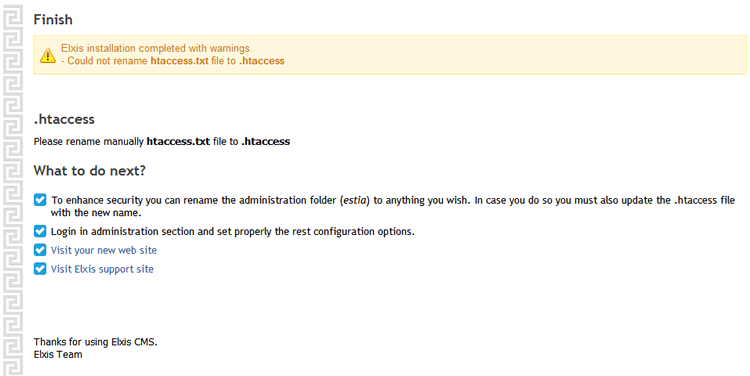
Step 5
That’s it! The Elxis installation has been completed successfully.! As you can see in the picture below, Elxis will advise us for any warnings, before we visit our new website.
Consecutively we recommend:
- Rename the administration folder (estia) to anything you wish. In case you do so, you must also update the .htaccess file with the new name.
- Login in the Administration section and set the rest of the configuration options.
- For any assistance you may refer to the official Elxis support website.
Notes
- [1]. Depending on the control panel of your hosting package (eg. cPanel) you can upload the file in compressed format and extract it using the File Manager or any other relevant tool.
Image Gallery


Users guide
Latest Articles
You are free to copy, distribute and transmit the articles in this site for non-commercial purposes.
![]()